
Background
There is a 'Clean Code' course in the Hanghae Plus program.
While taking the course, I learned key factors for refactoring and methods to improve code quality.
During the process, I learned about and applied the concept of Feature-Sliced-Design (FSD).
Since there are many enforced rules, I tried to apply them in my projects and in the real-world work I'm experiencing as a NAVER Webtoon intern, but I felt inconvenienced by the lack of a proper Lint plugin.
So, I decided to develop one.
Problem Situation
If you're going to use a tool, it's better to utilize something that already exists rather than unconditionally trying to create one.
This is one of my development philosophies. One of the advantages of software is 'reusability'. So, I always go through a research process.
The official documentation recommended a tool called Steiger.
However, it didn't have the configuration I needed, and since it's a separate library rather than ESLint, there was the difficulty of having to install and manage it.
| Comparison Item | Steiger (Separate CLI Tool) | ESLint Plugin |
|---|---|---|
| Installation and Maintenance | - Requires separate tool (client/server) installation in the project - Requires additional dependency and version management - Need to notify entire team for reinstallation when tool updates | - Just add a plugin to existing ESLint configuration - Reduced burden of separate tool management - Only need to worry about ESLint version management |
| Development Workflow and Editor Integration | - Since dedicated CLI needs to be run, immediate feedback within IDE may be difficult - There may be Steiger-related plugins for each editor, but they may not be universal | - ESLint integrates immediately with almost all IDEs like VSCode, WebStorm - Can check lint errors in real-time - Automatic checking possible in GitHooks/CI pipelines without separate setup |
| Rule Control and Granularity (Lint Rules) | - Must use based on provided rules - Rule granularity and direct customization (except open source contributions) are limited - Being CLI-based, autofix feature within editor may be difficult to use | - Can utilize ESLint's Rule system as-is - Rule granularity and severity settings like error/warning are flexible, exception handling is easy to configure - Deep rule writing possible through AST analysis - Can utilize automatic fixes like ESLint autofix |
| Onboarding and Training | - Need to additionally guide new team members on Steiger tool installation and usage - Learning burden of separate tool for those who only have ESLint experience | - Most developers are familiar with ESLint - Minimal learning burden as it only requires guidance like "ESLint rules have been added" - Migration and team consensus are easy |
| Extensibility and Customization | - Need to consider options and versions provided by the tool itself - Must wait for tool updates when advanced features or modifications are needed - Open source contribution process can be complicated | - Quick feedback and contributions possible when released as open source - Easy integration with @typescript-eslint/parser for TypeScript extensions - Easy to add/modify rules according to project requirements |
For the above reasons, I researched ESLint plugins.
In the process of searching, I found several tools. However, each of them had problems.
| Tool | Description | Inconveniences |
|---|---|---|
| Eslint plugin for FSD best practices | An ESLint made based on FSD BP. | Last maintenance was 4-5 years ago, and it's not being properly managed. As a result, it lacked support for Flat Config which is enforced in the latest versions of ESLint 9 and above. |
| ESLint plugin fsd import | It seemed like a Lint made for personal use. | It's not being properly managed and the functionality is limited. It had low reliability and was difficult to use. |
| @feature-sliced/eslint-config | A Lint for FSD with 135 stars and downloaded by over 8000 people. | Proper management was last done in 2022, and Flat Config support wasn't available. |
Besides these, I looked for various other tools, but there was no plugin that perfectly fit my needs.
Among the necessary elements, the core part that needed to be addressed was support for Flat Config.
Especially, since the official documentation mentioned that support for ESLint versions before 8.x would be discontinued, new projects needed to use ESLint 9 or higher.
In the method I found, if a specific ESLint Plugin doesn't provide Flat Config, there was no way to apply it to Flat Config without modifying the plugin's code itself.
So, I decided to create an ESLint Plugin directly to solve this problem.
Project Goals
- Create an
ESLint Pluginthat complies withFeature-Sliced-Designconventions. - Support
Flat Config. - Understand how
ESLintworks while creating theESLint Plugin.
In fact, I had only been using existing configurations without properly understanding ESLint.
So through this challenge, I decided to properly understand ESLint and create an ESLint Plugin that complies with Feature-Sliced-Design conventions.
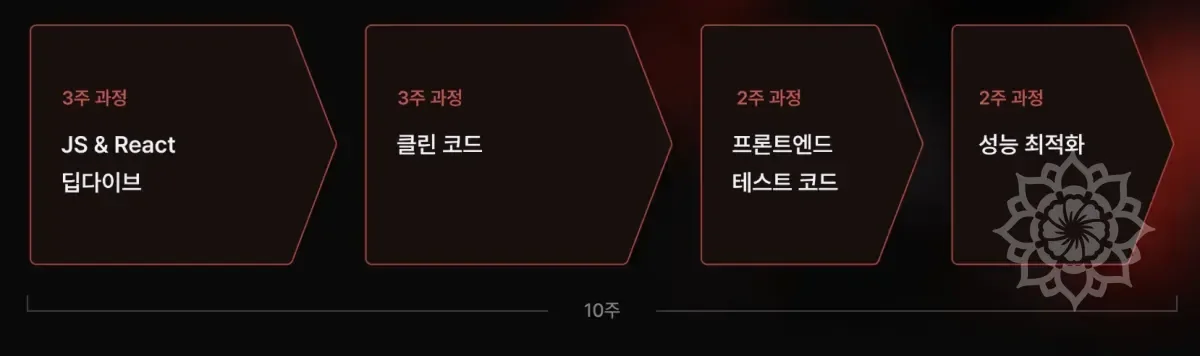
Plan
Since this was a challenge I was attempting for the first time, everything was new and everything was a barrier.
Since there were many things I was lacking, I needed to approach this strategically.
I established goals and made plans to effectively achieve them.
| Plan | Content |
|---|---|
| 1. Understanding Basic Concepts and Environment Preparation | - Learn the basic concepts and how ESLint works. - Basic environment setup for creating ESLint plugins. - Learn basics of NPM package and module management. |
| 2. Understanding the Basic Structure of ESLint Rules | - Try writing simple custom rules. - Understand ESLint's AST (Abstract Syntax Tree) and ESLint Rule API. |
| 3. Understanding Feature-Sliced Design, Designing and Implementing Related Rules | - Learn the structure and philosophy of Feature-Sliced Design. - Conceptualize how to convert design principles into ESLint rules. - Draft rules for FSD. |
| 4. ESLint Plugin Development | - Package multiple rules as a plugin. - Test and debug the plugin. |
| 5. Deployment Preparation and Testing | - Write plugin documentation. - Learn the process of deploying the plugin to NPM. |
| 6. Test by Applying to Actual Projects | - Conduct usability tests to see if it works properly while applying to actual projects. |
This is a curriculum I created with GPT. I decided to slowly follow this and proceed with the project.
This article will also proceed according to this process.
Stage 1: Understanding Basic Concepts and Environment Preparation
Goals
- Understand the roles and how ESLint and Prettier work.
- Set up the basic environment for ESLint plugin development.
- Learn package management and development environment setup using NPM.
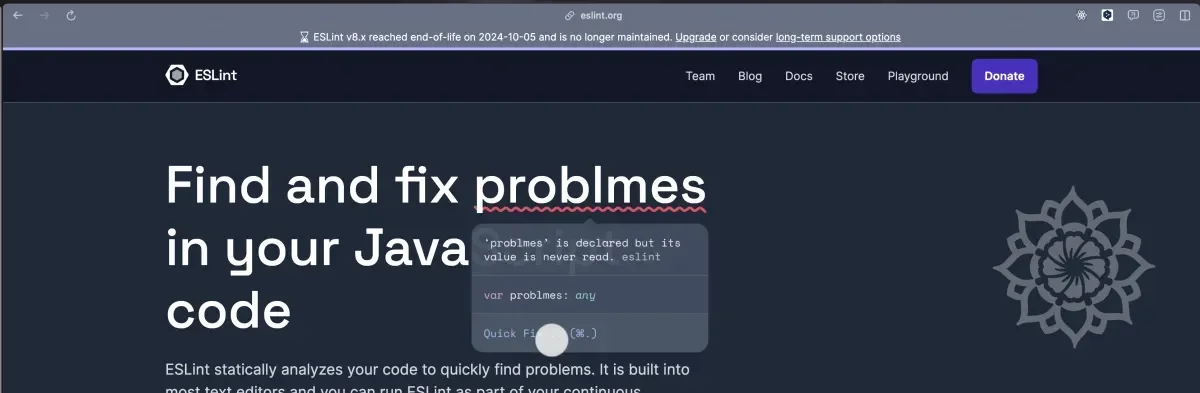
What is ESLint?
Before we begin, let's briefly look at what ESLint is.
Find and fix problems in your javascript code.
As you can see from the description above, it's a tool that finds and fixes problems in JavaScript code.
ESLint statically analyzes your code to quickly find problems. It is built into most text editors and you can run ESLint as part of your continuous integration pipeline.
ESLint aims to statically analyze code to quickly find problems and maintain consistent code quality.
It's not dependent on libraries or frameworks and can be used in most text editors.
Also, ESLint can be used in CI pipelines.
Summary of ESLint's Main Features
The main features of ESLint can be summarized as follows.
| Feature | Description |
|---|---|
| Syntax Error Detection | Catches possible errors in code. |
| Code Style Check | Helps maintain team rules and code style. |
| Auto-fix | Automatically fixes problems when possible. |
| Extensible | Can be extended as desired by adding plugins or rules. |
Why ESLint is Important
ESLint plays an important role in maintaining code quality and keeping code conventions consistent among team members.
Especially in large-scale projects, such tools are essential.
It reduces debugging time and prevents unnecessary resource waste related to conventions.
In other words, it's important because it's a tool that increases productivity.
How ESLint Works
ESLint works through the following process.
1. Code Input
ESLint reads in JavaScript or TypeScript files to inspect.
2. Parsing
To analyze the code, it uses a Parser to convert it into an AST (Abstract Syntax Tree).
By default, ESLint uses a parser called espree, but to support TypeScript, you can also use custom parsers like @typescript-eslint/parser.
AST is a data structure that represents code structure in tree form.
As an example, this code is converted to the following AST.
Program
 ├── VariableDeclaration (const sum)
 │    ├── VariableDeclarator
 │    │    ├── Identifier (sum)
 │    │    ├── ArrowFunctionExpression
 │    │         ├── Parameters (a, b)
 │    │         ├── Body (BinaryExpression +)
3. Applying Rules
ESLint traverses the AST and applies configured Rules.
Rules operate according to Node Type, and when specific patterns are found, they can report errors or automatically fix them.
For example, if the no-console rule is enabled, ESLint will display a warning if there's code like console.log().
At this time, ESLint uses the Visitor Pattern to inspect rules for each node.
This rule is a simple example where ESLint displays a warning when using a variable called temp.
4. Reporting
- ESLint outputs the inspection results to the console or file.
src/index.js
2:5 error Unexpected console statement no-console2:5→ Problem occurred at line 2, position 5error→ Error levelUnexpected console statement→ Message defined in the ruleno-console→ Applied ESLint rule name
5. Auto-fixing
- Some rules can be automatically fixed. (Using --fix option)
For example, if the semi (semicolon enforcement) rule is applied:
After auto-fix:
Main Components of ESLint
ESLint is composed of the following main components.
1. Parser
- Responsible for converting code into AST.
- By default, it uses
espree, but to support TypeScript or JSX, a different parser needs to be specified.- TypeScript support:
@typescript-eslint/parser - Babel support:
babel-eslint
- TypeScript support:
2. Rule Engine
- Responsible for executing and applying rules while traversing the AST.
- ESLint has built-in rules, but custom rules can also be added.
- User-defined rules can be added through
eslint-plugin.
3. Formatter (Output Formatter)
- Responsible for outputting ESLint results to console or file.
- By default, the
stylishformatter is used, but various formatters like JSON, HTML, Markdown can be used through the--formatoption. - Example)
eslint src --format json
4. Fixer (Auto-fixer)
- When using the
--fixoption, ESLint automatically fixes some rules. - However, logical problems cannot be fixed. (e.g., problems like no-unused-vars)
Role of ESLint Configuration Files
The behavior of ESLint is determined based on configuration files.
Additional Concepts for Deep Understanding of ESLint's Operation
1. Code Analysis Using AST (Abstract Syntax Tree)
Since ESLint operates based on AST, directly examining the AST makes rule creation easier.
- Tools like AST Explorer can be used to visually check the AST of code.
2. Plugins and Extensions
ESLint can extend functionality by adding plugins. (This is the element I want to create through this project.)
- Example: Adding a React plugin
- Add to configuration file
Preparing the Basic Development Environment
1. Installing Node.js
Since ESLint runs in a Node.js environment, Node.js must be installed.
Download and install the LTS version from the Node.js official website.
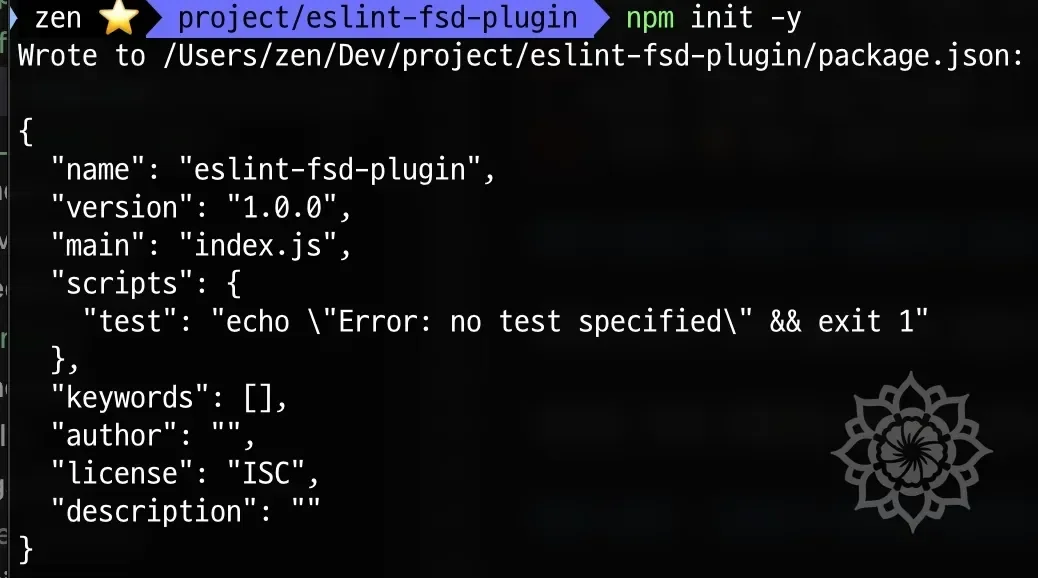
2. Creating the Project Directory
Create a project directory to develop the ESLint plugin.
3. NPM Project Initialization
Initialize the NPM project.
This will create a package.json file. This file manages the project's settings and dependencies.
4. Installing ESLint
Install ESLint.
Use the --save-dev option to install as a development dependency. (This means it's only used in the development environment and won't be included in the build.)
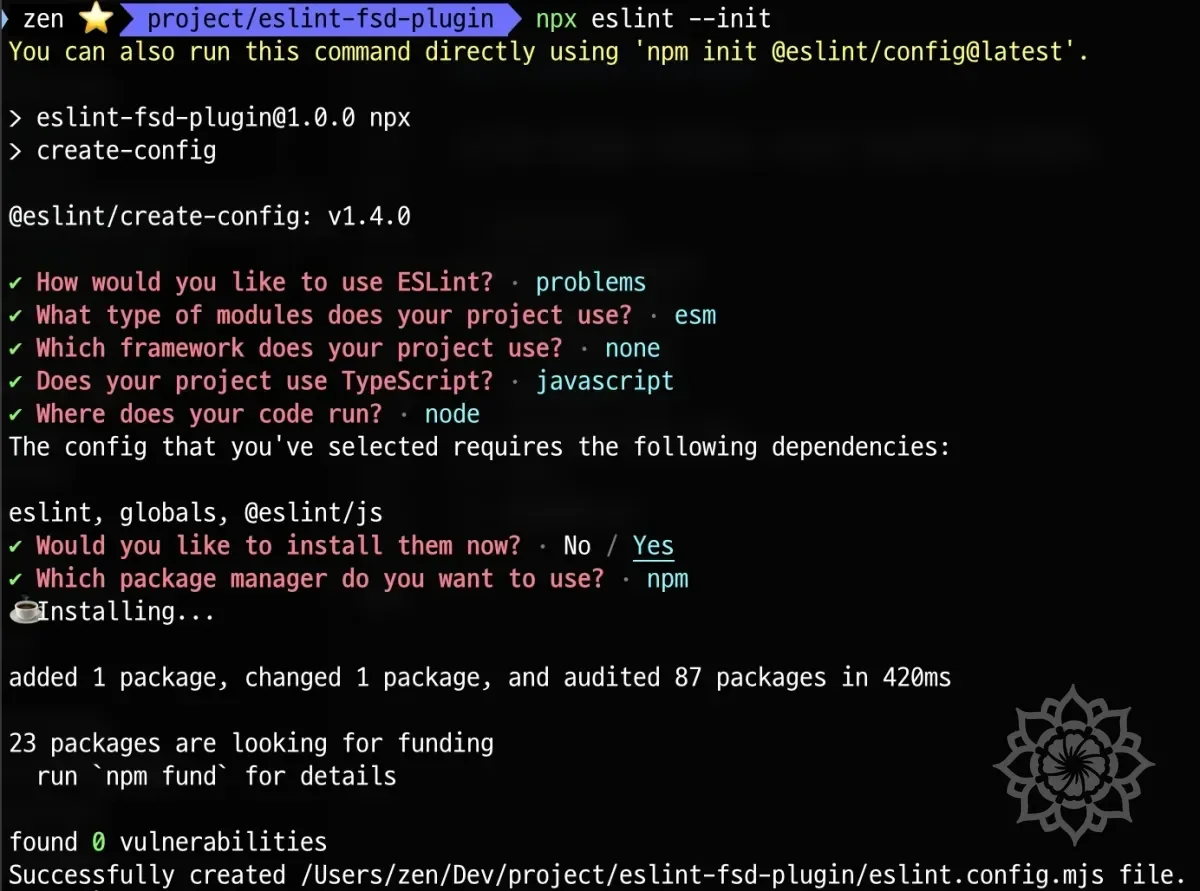
5. Initializing ESLint
Initialize ESLint.
Running this command starts the ESLint initialization setup.
- "How would you like to use ESLint?" → Select "To check syntax, find problems, and enforce code style".
- "What type of modules does your project use?" → Select "JavaScript modules (import/export)".
- "Which framework does your project use?" → Select "None of these" (React can be added later if needed).
- "Does your project use TypeScript?" → Select "No" (because we're starting with JavaScript).
- "Where does your code run?" → Select "Node".
- "Would you like to install them now?" → Select "Yes".
- "Which package manager do you want to use?" → Select "npm".
Installing Prettier
Prettier is a tool that automatically formats code style.
When used with ESLint, you can manage both code quality and style.
Since we'll cover this at the very end, let's just install it for now.
Designing the Directory Structure
Keep the initial directory structure simple.
eslint-fsd-plugin/
├── node_modules/
├── .eslintrc.js
├── package.json
├── package-lock.json
├── src/
└── README.md
Stage 2: Understanding the Basic Structure of ESLint Rules
Goals
- Understand how ESLint analyzes code (parsing, AST usage).
- Create a simple ESLint rule yourself.
- Learn how to apply and run rules.
Recalling ESLint Rules Once More
We already covered in detail how ESLint works earlier, but since it's important content for project progress, let's recall it once more.
ESLint operates based on AST (Abstract Syntax Tree), not simple string comparison.
What is AST?
AST represents the structure of code in tree form.
For example, let's look at the code below.
The AST of this code is roughly represented as follows.
Program
├── VariableDeclaration (const message = "Hello, world!")
│   ├── Identifier (message)
│   └── Literal ("Hello, world!")
└── ExpressionStatement (console.log(message))
    ├── MemberExpression (console.log)
    └── Identifier (message)
In this way, the structure of code is represented in tree form through AST.
ESLint analyzes code and applies rules using this tree.
Creating a Simple ESLint Plugin
I understand the principle, but I can't quite grasp how to create rules using this.
So, I want to practice by creating a simple rule.
Let's create a rule that prevents using console.log as described in the previous example.
1. Creating Rule Directory
First, create a directory to store rules.
Here, the -p option automatically creates parent directories.
For example, if you're trying to create the src/rules folder but src doesn't exist, using mkdir -p will automatically create it starting from src.
2. Creating Rule File
Create a file to store the rule.
3. Writing Rule Code
Now, write the rule code in the no-console-log.js file.
This code performs the following roles.
- ESLint finds
CallExpressionnodes. -> This means function calls. - If
console.logis called:node.callee.object.name === "console"node.callee.property.name === "log"
- If the above conditions are met, ESLint displays a warning message.
4. Creating a Plugin Based on the Rule
Now it's time to register the rule we created in eslint.config.mjs.
In Flat Config, unlike the existing .eslintrc.js method, plugins must be explicitly registered and rules must be called using namespaces.
As shown above, register the plugin in the plugins property and call rules in the format [plugin-name]/[rule-name].
So even if you created a rule like no-console-log.js, the plugin needs to be configured separately.
Currently we only created a rule, not a plugin.
ESLint requires a plugin for applying custom rules.
Therefore, we need to create a plugin to apply the rule.
(1) Creating a Plugin
You need to wrap rules in plugin format in index.js.
In Flat Config, defining a rules object within the plugin is mandatory.
At this time, the file name doesn't have to be index.js. (e.g., plugin.js)
However, by convention, since it's also the starting point of the plugin, the name index.js was used.
Let's create it as follows.
As shown above, create a rules object to register rules.
The important points here are as follows.
- Create a
rulesobject to register rules. - The
rulesobject must be included when exporting. - When set as
export default { rules: { "no-console-log": noConsoleLog } };format, Flat Config will recognize it correctly.
5. Using the Plugin Created in Flat Config
Now you need to clearly register the plugin in eslint.config.mjs and set up the namespace.
Open the file and add the following.
Important Points Here
- You need to register the plugin in the format fsd: eslintFsdPlugin inside the plugins object.
- In rules, you must call it with the namespace (fsd/) like "fsd/no-console-log".
- "no-console-log" → ❌ Error occurs
- "fsd/no-console-log" → ✅ Correct way
5. ESLint Execution Test
Now let's create a file containing console.log and run it.
(1) Create Test File
Then add the following code to the test.js file.
(2) Run ESLint
(3) Check Execution Result
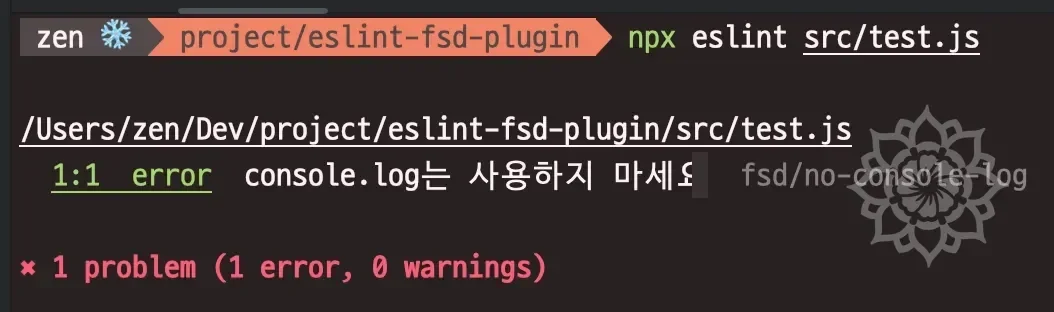
You can confirm that the error is output normally.
6. Debugging When Running npx eslint
After applying all settings correctly, you need to verify that ESLint is loading the plugin normally.
Points to Check in Debug Results
- Loaded plugin: fsd
- If there is a
Loaded plugin: fsdlog, the plugin has been loaded normally.
- If there is a
- Applying rule: fsd/no-console-log
- If there is an
Applying rule: fsd/no-console-loglog, the rule is being applied.
- If there is an
- ESLint Execution Result
test.js 1:1 error Do not use console.log. fsd/no-console-log- If the error occurs as shown above, it is working normally.
7. Summary
In this stage, we proceeded with the following content.
| Stage | Modifications | Description |
|---|---|---|
| 1️⃣ Rule Definition Fix | Set meta.messages and context.report() correctly in rules/no-console-log.js | meta information is required in Flat Config |
| 2️⃣ Plugin Configuration | Export including rules object in index.js | Defined in rules: { "no-console-log": noConsoleLog } format |
| 3️⃣ Apply Flat Config | Register as plugins.fsd in eslint.config.mjs and apply rule in "fsd/no-console-log" format | plugins object is required in Flat Config |
| 4️⃣ ESLint Debugging | Run npx eslint --debug src/test.js | Confirm Loaded plugin: fsd and Applying rule: fsd/no-console-log |
- In Flat Config, ESLint plugins must be registered as a namespace.
- "no-console-log" → ❌ Error occurs
- "fsd/no-console-log" → ✅ Correct way
- The rules object must be exported as a plugin in index.js.
export default { rules: { "no-console-log": noConsoleLog } };→ ✅ Correct way
- Before running ESLint, you should verify that the plugin is loaded correctly with npx eslint --debug.
- Make sure to check for the Loaded plugin: fsd log.
Stage 3: Feature-Sliced Design (FSD) Based ESLint Rule Design and Implementation
So far, we've created a simple ESLint rule.
From now on, let's understand Feature-Sliced Design (FSD) and proceed with designing rules for it.
Goals
- Review the concepts of Feature-Sliced Design (FSD) once more.
- Design what role ESLint rules should play in FSD structure.
- Directly implement basic FSD rules.
What is Feature-Sliced Design (FSD)?
FSD is an architecture that structures projects around features to enhance scalability and maintainability.
It's an architecture pattern that maximizes maintainability and scalability by organizing frontend projects around features.
Unlike traditional folder-based structures like pages, components, services, the core is to structure according to business domains and features.
Core Principles of FSD
1. Feature-Oriented Architecture
- Unlike traditional layer-based structures (e.g., structures where all components and services gather in
components/,services/folders), it follows a method of dividing folders by each feature unit and placing all related elements (UI, state, API calls, logic, etc.) in one place. - For example, all elements related to Authentication are placed inside
features/auth/, and Payment-related elements are placed infeatures/payment/. - Grouping by feature unit increases reusability and makes maintenance easier.
Like REST API, it has the effect of clearly expressing what the code does through the directory itself.
For example, the features/auth/ directory contains all code related to authentication processing, and the features/payment/ directory contains all code related to payment processing.
In the case of entities/auth/ directory, it contains code related to processing logic related to authentication information.
In this way, there is an advantage that you can easily grasp what function it is responsible for just by looking at the directory name.
2. Layered Architecture
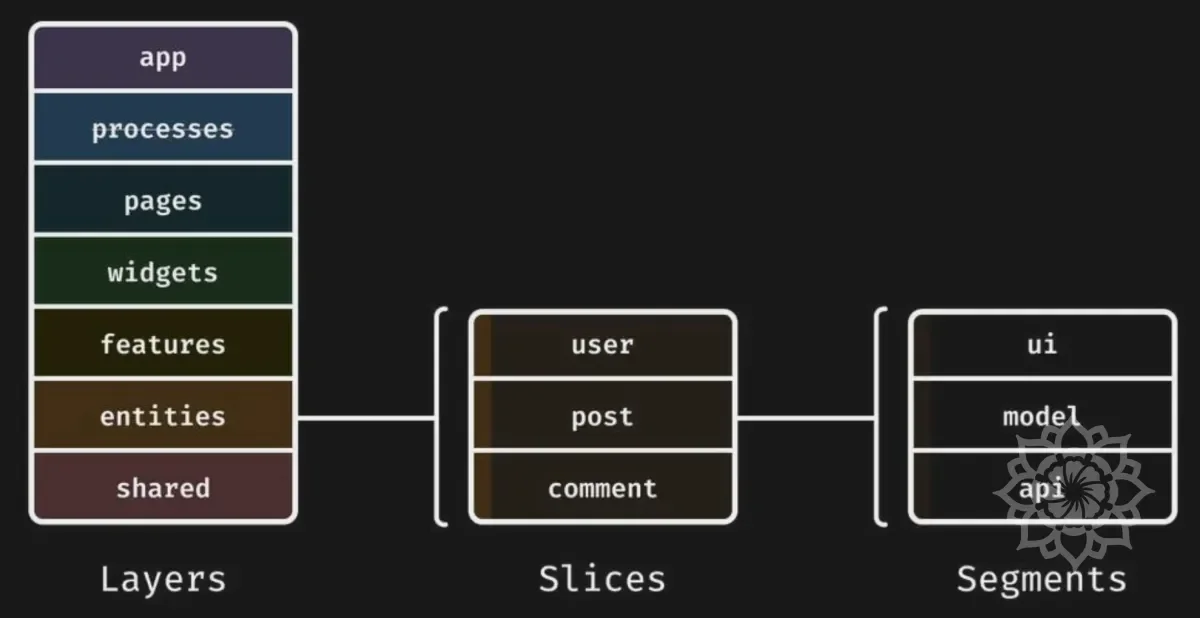
- FSD consists of 7 layers, and upper layers can reference lower layers, but conversely, lower layers are prohibited from referencing upper layers. (Prevention of upward dependency)
- ✅ Correct reference relationship
App → Process → Pages → Widgets → Features → Entities → Shared - ❌ Wrong reference examples
Features → Pages (X)  // Features layer should not reference Pages
Entities → Features (X)  // Entities should not reference Features
Thanks to this layer structure, FSD can reduce coupling between code and maximize maintainability.
3. Proper Dependency Management (Dependency Rules)
- In FSD, clear dependency rules must be followed.
- In particular, the core is to force that upper elements cannot be referenced when importing.
Rule: Cannot reference upper layers
- Inside features/, you cannot import code from pages/ or widgets/.
- Inside entities/, you cannot import features/ or widgets/.
- ✅ Correct import example
- ❌ Wrong import example
If you follow this principle, lower modules don't depend on upper modules, so coupling becomes lower and it becomes easier to maintain features independently.
4. Domain-Driven Design (DDD)
- Design by grouping each domain (e.g., user, product, payment, etc.) by feature unit.
- In traditional MVC patterns, models and services exist separately, but FSD takes an approach similar to domain-driven design by gathering and placing all related elements (UI, state, API, logic, etc.) around features.
This makes code exploration easier and has the advantage of making maintenance simpler by feature unit.
5. Increased Reusability and Modularity
- Place commonly used utilities, styles, API functions, basic components, etc. in the
Sharedlayer to prevent duplication and make them easily reusable throughout the project. - Components, state management, and API requests are modularized by Features unit, enabling independent development.
- Example:
/shared/ ├── api/ ├── ui/ ├── utils/ - For example, a
Buttoncomponent that can be reused on all pages should be located inshared/ui/Button.tsx.
6. Increased Maintainability and Scalability
- Following FSD's structure makes maintenance easier even as the project grows.
- When adding new features, you can develop independently without affecting existing code.
- Refactoring becomes easy → Modifying only specific features doesn't affect the entire project.
- Team collaboration becomes easier → Work can be divided and progressed by feature unit.
In particular, FSD has very detailed documentation and related examples.
If you adopt this, you can significantly reduce the cost of synchronizing thoughts about architecture within the team.
This is because you just need to make decisions based on detailed documentation, and only need to agree on ambiguous things.
7. Summary
| Advantage | Description |
|---|---|
| Code readability and maintainability increase | Easy to find because code is organized by feature |
| Excellent scalability | The advantages of FSD are maximized as the project grows |
| Dependencies become clear | Reduces coupling by forcing lower layers not to reference upper layers |
| Domain-centric development becomes possible | Application fits well with actual business logic |
| Refactoring becomes easier | Stable changes are possible because you can modify by feature unit |
| Collaboration among team members becomes easy | Work can be divided and progressed by each feature unit |
Why ESLint Rules are Needed in FSD
FSD is a method that structures projects around features to increase scalability and maintainability.
However, if developers don't maintain this consistently, it can rather cause confusion.
| Problem Type | Example | Problem |
|---|---|---|
| ❌ Wrong layer import | import app/ from features/ | features shouldn't know about app, but dependency forms |
| ❌ Wrong path import | import Button from "../../shared/ui/Button"; | Importing with relative paths (../../) makes maintenance difficult |
| ❌ Wrong inter-slice dependency | features/auth directly imports features/payment | Should be independent of each other but strong dependency forms |
| ❌ Wrong global state access | import app/store.ts from features/ | feature shouldn't directly know about global store |
| ❌ Wrong UI element import | import widgets/ from entities/ | Business logic (entities) shouldn't know about UI |
The above problems are mistakes that developers often make.
What Rules Will I Create?
I will create rules that monitor code that breaks FSD principles.
And naturally, these rules will be created based on Flat Config, and I will create plugins to apply them.
Options will be set to error by default.
However, naturally, rules can be modified as the user wishes, so I intend to implement it so that users can warn or off as needed.
List of ESLint Rules I Will Create
| Rule Name | Description | Example (Wrong Code) |
|---|---|---|
forbidden-imports | Prohibit upper layer import and cross-import | features/ → app/ import prohibited |
no-relative-imports | Prohibit relative path import, force using alias like @shared/ui when importing | import Button from "../../shared/ui/Button"; ❌ |
no-public-api-sidestep | Prohibit bypassing public API (index.ts) import | import { authSlice } from "../../features/auth/slice.ts"; ❌ |
no-cross-slice-dependency | Prohibit import between feature slices (features/auth → features/payment ❌) | import { processPayment } from "../payment"; ❌ |
no-ui-in-business-logic | Prohibit UI import in business logic (entities → widgets prevention) | import { Header } from "../../widgets/Header"; ❌ |
no-global-store-imports | Prohibit direct global store import | import store from "../../app/store.ts"; ❌ |
ordered-imports | Import ordering (grouping by layer) | import { Button } from '@shared/ui'; import { User } from '@/entities/user'; ❌ |
- Rule names were written with reference to steiger, FSD's linter.
- Except for
forbidden-imports, it was designed to support linting for parts not supported bysteigerwithout overlapping elements. - I plan to add content from
steigerin the future.
Explanation of Each Rule's Necessity
1. forbidden-imports: Applying Correct Inter-layer Dependencies
- Prohibits importing lower layers from upper layers.
- For example, prevents importing
app/fromfeatures/. - This rule guides adherence to FSD's layer structure.
2. no-relative-imports: Enforcing Path Alias Usage
- Prohibits using relative paths (
../../) and forces using aliases (@shared/ui). - This is to improve code readability and make maintenance easier.
3. no-public-api-sidestep: Enforcing Import Through public API
- Forces not to directly import internal files of each slice (
features,entities,widgets). - Restricts to always import through
index.ts.
4. no-cross-slice-dependency: Limiting Inter-Slice Dependencies
- Prohibits imports between feature slices.
- Prevents importing
features/paymentfromfeatures/auth. - This is to ensure each feature can operate independently.
5. no-ui-in-business-logic: Limiting UI Layer Imports
- Restricts business logic (
entities) from importing UI (widgets).
6. no-global-store-imports: Limiting Global State Management Access
- Prohibits directly importing global state (store) from feature, widgets, entities, etc.
- Global state should be accessed through state management hooks like
useStore,useSelector. - Applies general rules considering various state management libraries like Redux, Zustand.
7. ordered-imports: Enforcing Import Statement Grouping
- Forces grouping of
importstatements to improve code readability. - For example, the goal is to improve code readability by grouping import statements by the same layer.
- Forces organizing when
importorder is randomly mixed.
Implementing ESLint Rules
Now let's implement the rules we designed above.
Implementing the no-relative-imports Rule
Implementing the no-public-api-sidestep Rule
Implementing the no-cross-slice-dependency Rule
Implementing the no-ui-in-business-logic Rule
Implementing the no-global-store-imports Rule
Implementing the forbidden-imports Rule
| Layer | Importable Targets |
|---|---|
| app | processes, pages, widgets, features, entities, shared ✅ |
| processes | pages, widgets, features, entities, shared ✅ |
| pages | widgets, features, entities, shared ✅ |
| widgets | features, entities, shared ✅ |
| features | entities, shared ✅ |
| entities | shared ✅ |
| shared | Does not import any layer ✅ |
This rule enforces the above structure.
Implementing ordered-imports Rule
Step 4: ESLint Plugin Development and Packaging
Let's look at how to develop and package an ESLint plugin.
Goals
- Bundle individual rules into a single ESLint plugin package.
- Organize into an NPM-distributable eslint-plugin-fsd format.
- Verify proper operation through testing and debugging.
Organizing ESLint Plugin Structure
So far we've implemented individual rules in the rules/ folder.
Let's create the following directory structure to organize it as a plugin package.
Delete the
no-console-log.jsthat was included for testing.
eslint-fsd-plugin/
├── src/
│   ├── rules/
│   │   ├── forbidden-imports.js
│   │   ├── no-relative-imports.js
│   │   ├── no-public-api-sidestep.js
│   │   ├── no-cross-slice-dependency.js
│   │   ├── no-ui-in-business-logic.js
│   │   ├── no-global-store-imports.js
│   │   ├── ordered-imports.js
│   ├── index.js   <-- Plugin entry point
├── tests/         <-- ESLint rule test code
├── package.json
├── eslint.config.mjs (Test Flat Config)
├── README.md      <-- Documentation
You can confirm the directory becomes like the above.
Packaging ESLint Plugin
From now on, this is the preparation process for packaging the ESLint rules I created and distributing them on NPM.
1. package.json Configuration
You need to configure package.json to make the ESLint plugin into a single package.
Add the following content to package.json.
name: Set to eslint-plugin-fsd-lint. (eslint-plugin-xxx format)main: Specifysrc/index.jsas the plugin entry point.type: Set tomodule.scripts: Addlintandtestscripts.lint: Run ESLint.test: Run tests.
keywords: Add ESLint, plugin, feature-sliced-design, fsd, lint keywords.author: Add the author. (I wrote my GitHub ID.)license: Apply MIT license.dependencies: Add since ESLint is required.peerDependencies: Add since ESLint is required.
2. Write index.js Plugin Entry Point
- Register all rules in the
rulesobject so they can be used in the plugin.
Plugin Testing
1. Modify ESLint Configuration File
Modify eslint.config.mjs for testing.
- Register
fsdPluginineslint.config.mjsso you can test the ESLint plugin.
2. Add Test File
Add a fsd-rules.test.js file in the tests/ directory.
- After running ESLint, outputs rule violation messages to proceed with testing.
3. Run Tests
Preparing Package for NPM Distribution
Step 5: Plugin Documentation and NPM Distribution
Actually, deployment has already been completed.
Now it's time to polish the deployed elements.
Goals
- Write a
README.mdfile to organize plugin usage instructions and rule explanations. - Provide guides so users can easily set up from GitHub and NPM pages.
- After package deployment is complete, establish version management and update strategies.
Code Localization
To handle the code officially, documentation and localization work is necessary.
So far, we've written comments and error messages based on our native language, Korean.
From now on, we'll remove Korean and change to English, and everything will be handled in English.
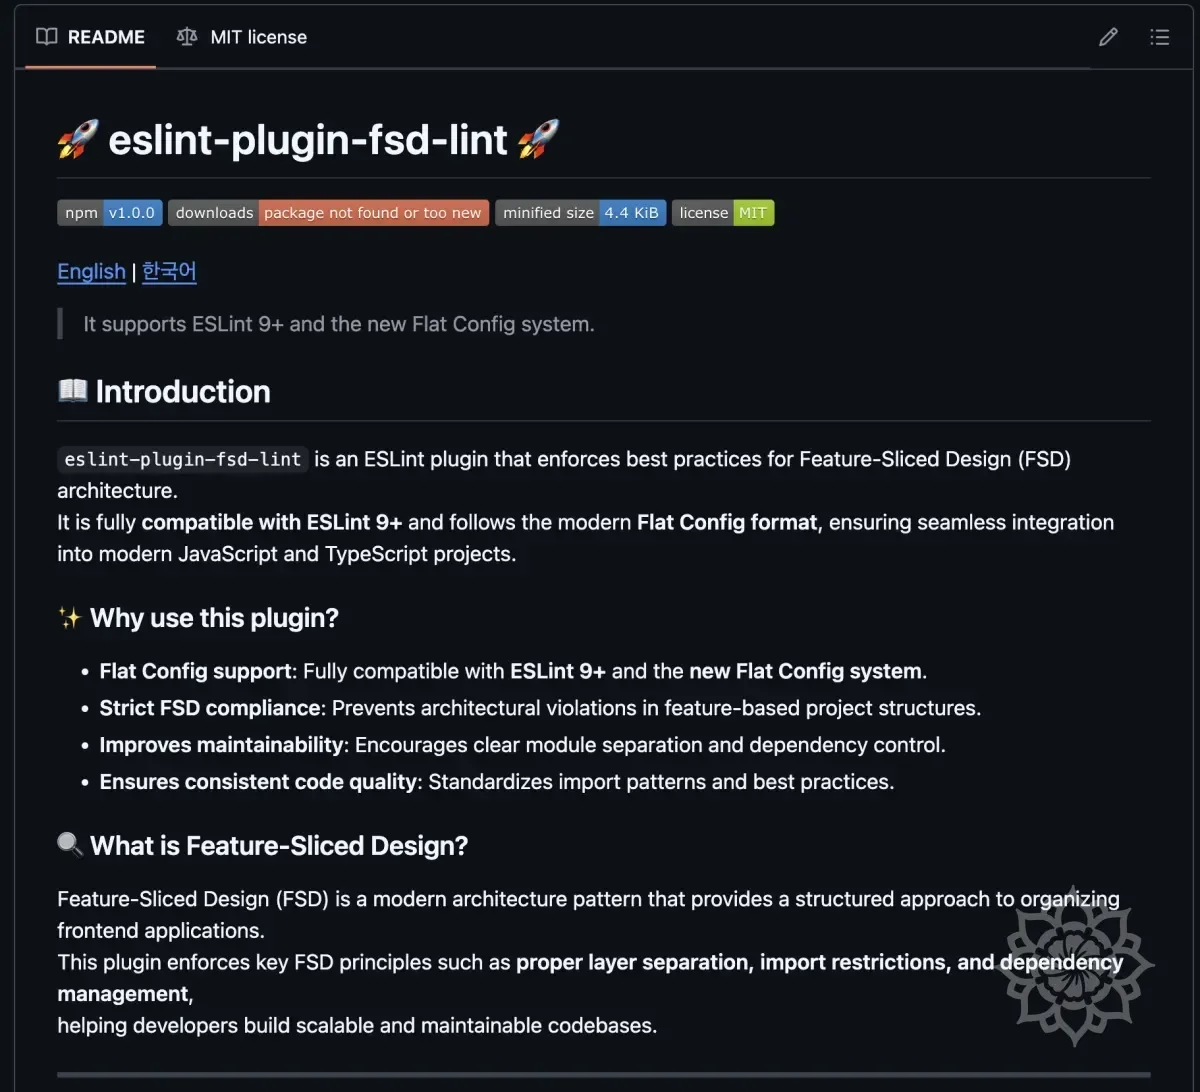
Writing Documentation Including README.md
Let's write the plugin usage instructions and rule explanations in README.md.
Since we'll support not only English but also Korean, we plan to write both.
Elements related to this are attached as images.
NPM Distribution
Let's distribute on NPM again based on the documentation we created.
NPM and Github Integration
When you integrate NPM and Github, you can use the feature that automatically distributes to NPM when you push code to Github.
Add Github Repository Information to package.json
To connect GitHub and NPM, you need to add repository and bugs information to package.json.
Bump the version from 1.0.1 to 1.0.2.
"repository"→ Connect GitHub repository address"bugs"→ Add issue tracking URL"homepage"→ Add GitHub README.md link
Commit & Push After package.json Update
Reflect the modified package.json to Github.
NPM Package Update
Redistribute the package with updated information.
Finally, update the release notes and the related work is complete.
CI/CD Configuration
Let's make it so that when you push a new tag on GitHub and create a Release, it automatically distributes to NPM.
To do this, we'll set up GitHub Actions to configure CI/CD (Continuous Integration/Continuous Deployment).
Step 6: Applying to an Actual Project
Let's apply the created Lint to an actual project.
Fortunately, there was a project that actively utilized FSD while working on Hanghae Plus.
There was no other FSD related Lint here, so it was a perfect fit.
I was using FSD but... had no lint... It was an optimal condition.
Install ESLint in Project
Since it was already deployed, I just needed to download and use it.
This project was using pnpm, so I installed it based on that.
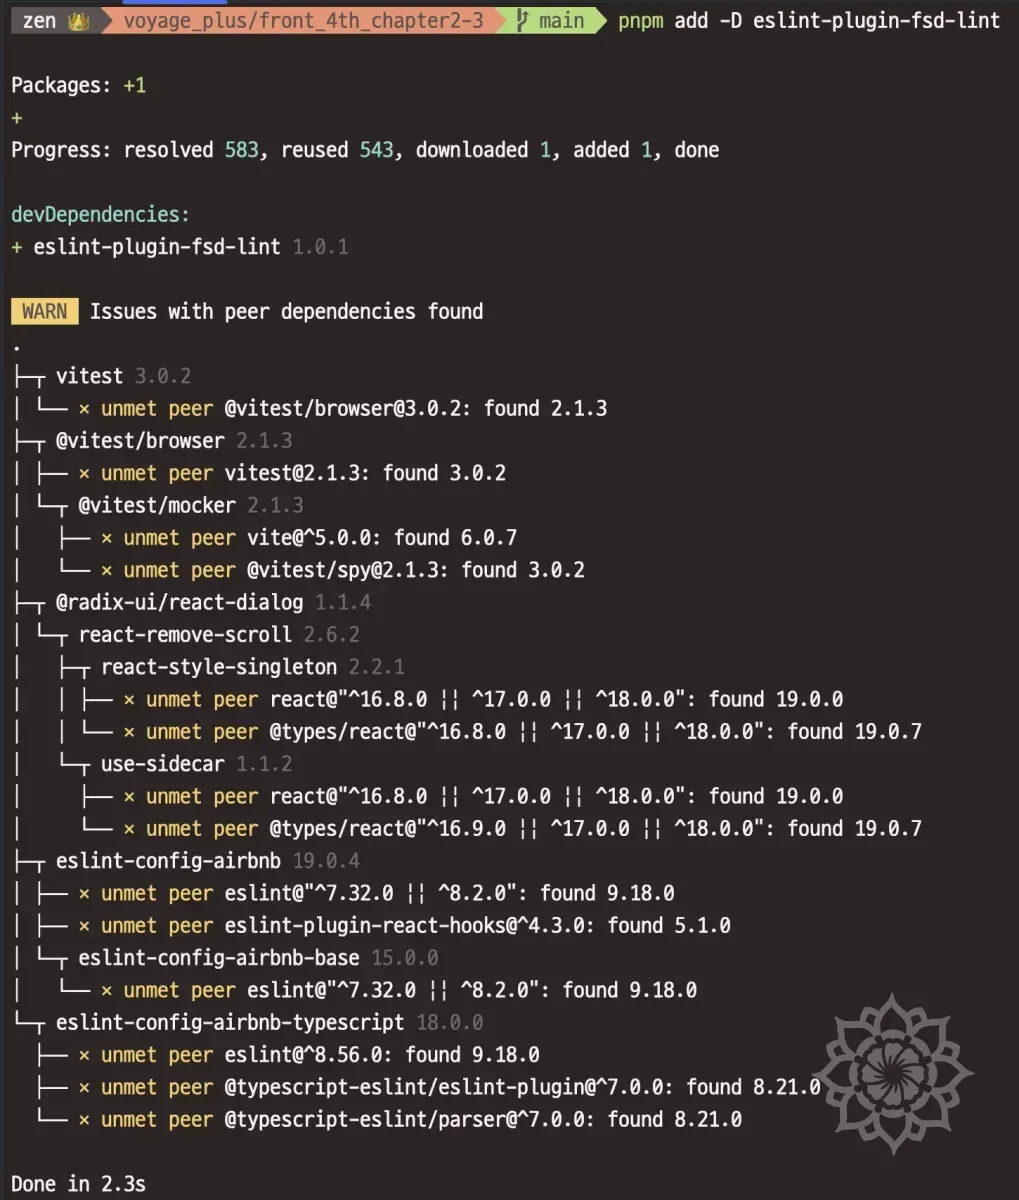
You can confirm it was installed successfully.
Configure ESLint in Project
I added the configuration as shown above.
Run ESLint in Project
I configured it as above and ran the lint.
The results are as follows.
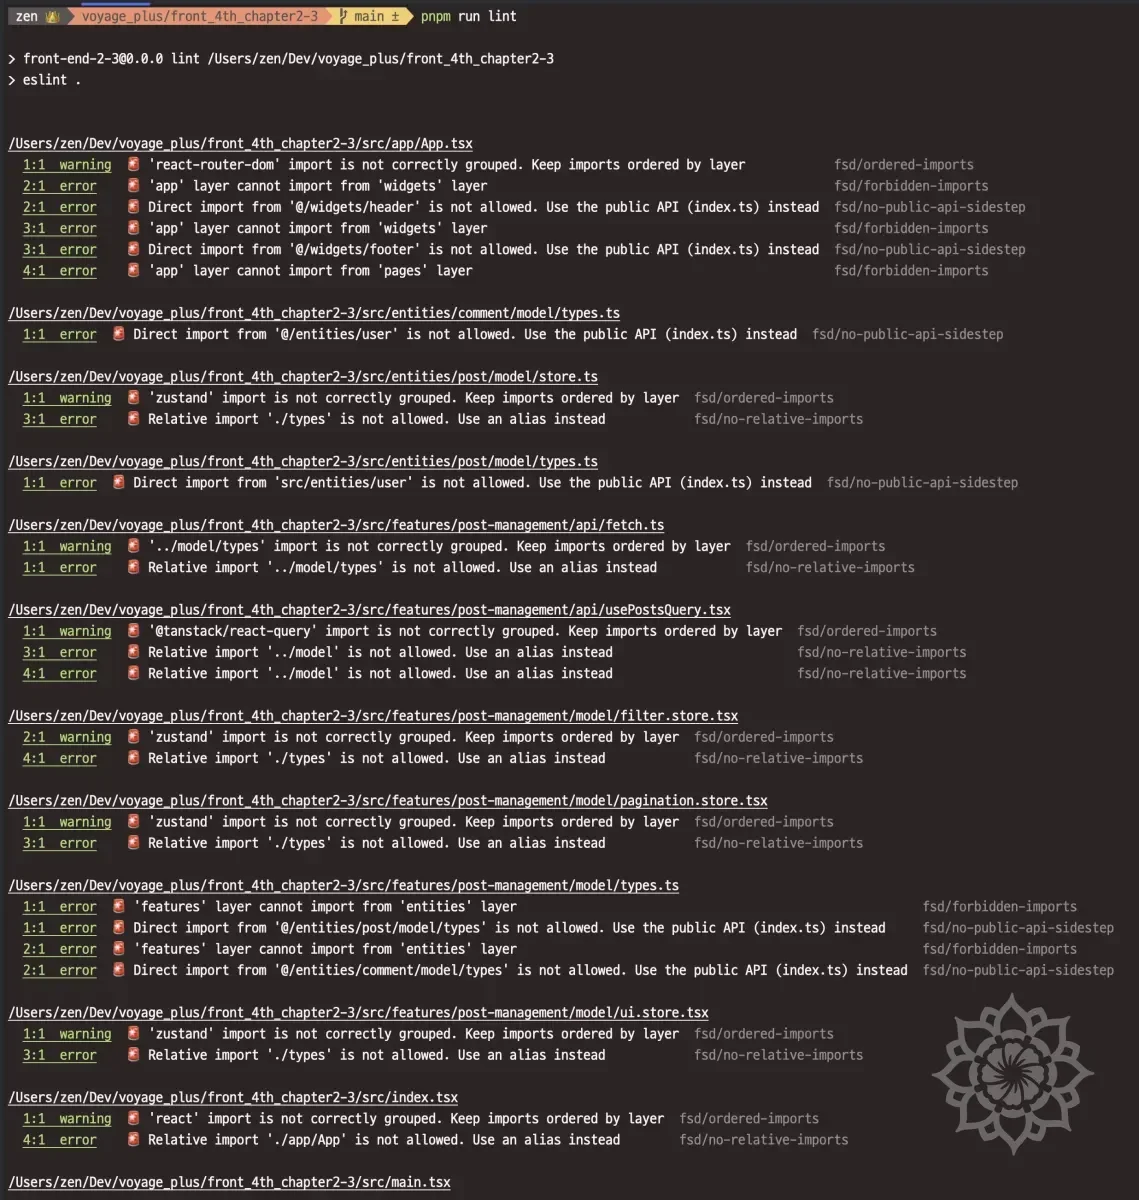
I could confirm it was working correctly.
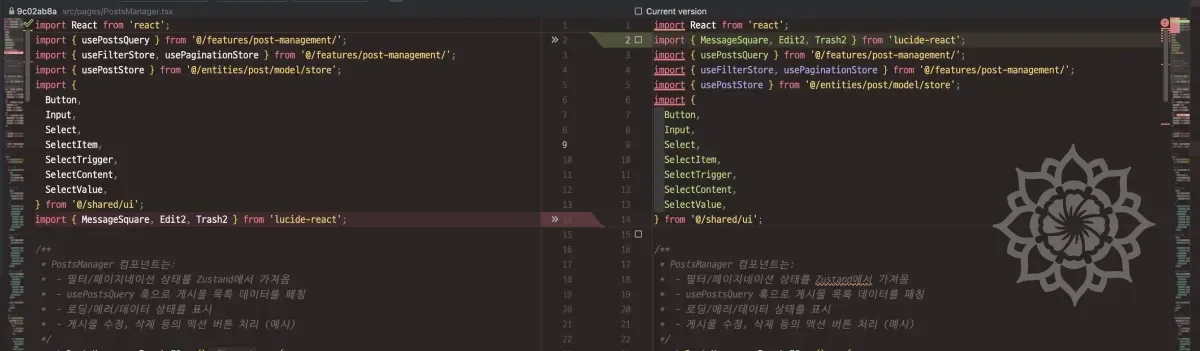
I could also confirm that fix was working correctly.
Summary
So far, I've created an ESLint plugin.
What started from inconvenience turned out to be more fun than expected.
The scale also grew quite a bit.
Through this, I was able to understand more clearly how ESLint works and what Flat Config is.
Also, this was my first time publishing an NPM package and creating Open Source, which was also a new experience.
It wasn't just about publishing and being done with it - there were related configurations to set up, and since actual deployment was happening, I had to be sensitive to bugs.
Currently the scale is small, but if it grows larger, tests will need to be more rigorous, and lint rules will also need to be stricter.
I made this during the Lunar New Year holiday as a review of existing Hanghae content, and also because I thought it might be needed in my internship work - I think it was a good decision.
My development skills seem to have improved a lot recently after BoostCamp ended. Or more precisely, my spirit of challenge?
It seems like my efforts to not avoid inconvenience and try to solve problems have increased.
I should maintain this state for a while and learn more things.
Future Plans
- I'm thinking of gradually porting the content supported by
SteigertoESLint. - Also,
Prettiersettings can be customized too, so I'm thinking about making something for that as well... but I have other things to do, so I'll think about it a bit more before trying.